Send Broadcast Emails to Your Customers (Web)
To learn how to send mass emails to your customers from Skimmer's website, see the video below. Or, if you prefer, scroll past the video to view our step-by-step text instructions.

Step-by-step instructions . . .
- 1
- Here’s how to send mass emails to large groups of your customers at once. Start by logging into GetSkimmer.com, then click on Broadcast Emails. If it’s your first time sending a broadcast email from Skimmer, you’ll get a nice graphic and button that says Send Your First Broadcast. As you can see here, though, we’ve already sent a few, so the first thing we see is the history of mass emails we’ve sent to our customers.
-

-
- 2
- You can access your Unsubscribed list with the button in the top right corner. Click that and you’ll see a list of any customers that have opted to unsubscribe from the broadcast emails.
-

- 3
- Back on the main screen, to compose a new email, click the Send New Broadcast button. You’ll be taken to the first email creation screen.
-

- 4
-
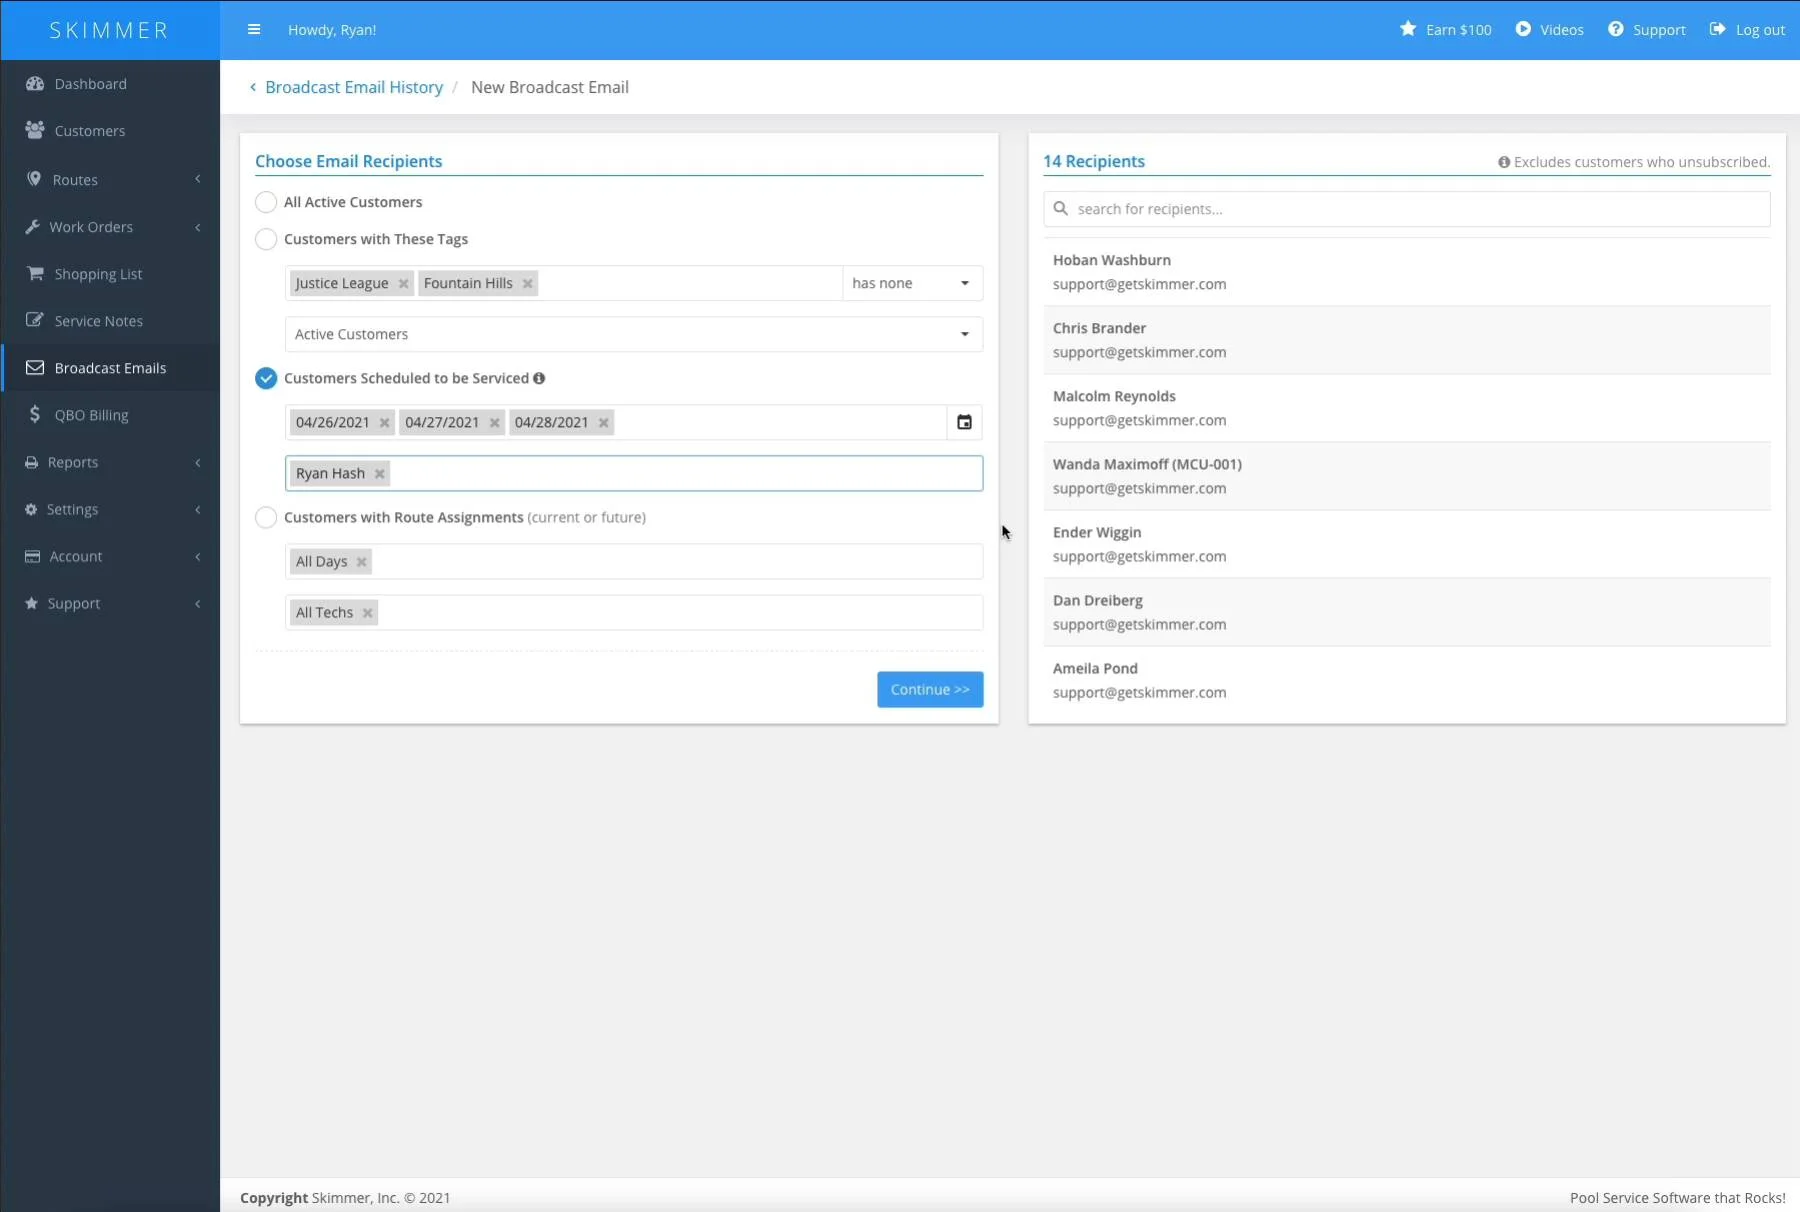
Under Choose Email Recipients, you can choose to send your email to different groups of customers. The top option is to send your email to All Active Customers. With this option chosen, look to the right and you’ll see a current list of recipients, which right now is all of your active customers. Note that this excludes customers who have unsubscribed. So if there’s someone missing from this list that you expected to see, it may be that they unsubscribed. You can scroll through the list or type a customer name in the search bar if you want to find them.


- 5
-
We also give you more options to customize who receives the email. For instance, you can email customers that have specific tags. Click the dropdown and choose whatever tags you want from your list. You’re not limited to just one tag, you can choose multiple.


- 6
-
You also have a dropdown filter that lets you choose how to use the tags. By default, the system chooses to filter customers who have all the tags that you’ve chosen. So, however many tags you’ve selected, Skimmer will filter down to the customers who have ALL of those tags. You can also select the customers who have ANY of these tags, even if it’s just one, and they’ll show up in the email list. Or you can reverse and choose to email only the customers who have NONE of these tags. So, for instance, if you don’t want Repair Only customers to receive a particular email, you can use a Repair Only tag to filter them out. And then you can further filter the message to be sent to customers that are Active, Inactive, or both.


- 7
-
You can also email Customers Scheduled to be Serviced. For instance, if you want to email everyone scheduled to be serviced on a particular day, you can do that. This includes anyone receiving regular service from a route assignment, anyone who’s had their service temporarily moved to the day you choose, and anyone scheduled for a work order on that day. So, anyone you see scheduled for work on the Route Dashboard. From the dropdown calendar, you can choose one or multiple dates. You can also filter by the techs scheduled for service. So if you only want to email customers being serviced by specific techs, you can do that. How might you use this? If you know a tech is going to be out sick tomorrow and work will need to be rearranged, this would be an easy way to keep your customers informed.


- 8
-
You can also choose to email customers based on route assignment. So, the information you’d see on the Route Assignments screen, that’s what you use here to choose who gets the email. This does not include anyone scheduled for work orders, or factor in one-time moves. So, let’s say your whole team is going on vacation for a day, and you want to let everyone regularly serviced on that day to know there will be a change. This is the perfect way to do it. Or if you just want to focus on one tech’s route, either for one day or multiple days, you can email that group of customers as well.


- 9
-
Once you make a final choice about which customers you want to email, click Continue.

- 10
-
Now it’s time to compose your message. Start by typing the subject line. Note that you can choose between Standard and Plain styling. Standard settings will inherit all the setup for your service emails, so the message will be styled to look similar to the service emails you send out, except with this message instead of service information. Plain will not have this, it will essentially just be a very basic text box with whatever message you enter. Then click in the main text box to compose your message.

- 11
-
Once completed, you have a number of formatting controls that allow you to edit the text or include other information. You control size, font, bold, italics, text justification. You can add an image or a table. Personalization, on the far right under symbol <#>, allows you to choose whether to include each recipient’s name or company name in message. Once finished, if you want to see what this message will look like before sending it to your customers, enter your email address at the bottom and click Send Preview, then look for the message in your inbox.

- 12
-
Once you’re ready and satisfied with the message, click the Email send button and then confirm. You’ll get a progress bar showing when it’s complete. After the email has been sent, you’ll be taken back to the opening screen, and you’ll see now that the message we just sent is part of the history. You can click the Details button if you want to review exactly what the message looked like and who it was sent to. And that’s how you send mass emails to your customers.


