Add, Edit, or Delete a Customer (Web)
Watch the video or scroll down for step-by-step instructions.
Tiers: All
Before You Start: Customers cannot be deleted if service and/or billing history is attached to the profile.

Overview
Skimmer's website lets you create a new customer account, update an existing customer's information, change their status, and track their activity, all from one profile.
Customer statuses and lead sources
Every new customer starts as a Lead. A customer's status automatically changes to Active when you assign them a route or convert their quote to a job. However, you can change an Active customer back to a Lead by clicking Set as Lead on the Edit Customer page.
Each lead source must have a unique name, and you can have up to ten. Deleting a lead source removes the association from any customer assigned to it and can't be undone.
Add a customer
- From the Customers page, click Add Customer.
The Add Customer page contains four sections: Customer Info, Service Location Info, Body of Water Info, and Route Assignment Info. The tables below list the fields in these sections and provide tips on how to fill them out.
Note: To create a customer quickly, you only need a name, billing address, and location address. You can fill in the rest of the information later.
Customer info
| Field name | Required | Description |
|---|---|---|
| First Name | Yes | Enter the customer's first and last name. |
| Last Name | ||
| Company | No | Enter a company name if it applies, and choose whether to display the company name on the customers list instead of the personal name. |
| Display As Company | ||
| Customer Code | No | Enter a customer code if you want a unique label to appear next to the customer's name on the customers list and route dashboard. |
| Billing Address | Yes | Enter the customer's billing address. |
| City | ||
| State Abbr. | ||
| Zip | ||
| Mobile Phone 1 / Label / Mobile Phone 2 / Label / Home Phone / Work Phone | No | Enter up to four phone numbers (two mobile, one home, one work), and add a label to each mobile number to indicate whose number it is. |
| Send service texts | No | Select the corresponding checkbox to send service, invoice, or quote texts to Mobile Phone 1. |
| Send invoice texts | ||
| Send quote texts | ||
| Email 1 / Send invoices / Email 2 / Send invoices / Email 3 / Send invoices / Email 4 / Send invoices | No | Enter up to four email addresses. Any you add here can receive service emails, and you can choose which will receive invoices from Skimmer Billing. |
| Tags | No | Assign any existing tags that apply to the customer, or type a new tag and press Enter to create one. |
| Lead Source | No | Select the lead source that best defines how you acquired the customer. The lead source allows you to track the effectiveness of marketing and referral channels. |
| Billing and Customer Notes | No | Enter billing and customer notes in the open text box. Only owner- and admin-level users can view this box. |
| Invoice Date | No | The Invoice Date section displays the default billing date for the customer. To select a different date, click Set Invoice Date. |
| Do not suspend this customer for overdue invoices | No | By default, Skimmer suspends a customer's service once their invoices are overdue past an admin-configured threshold (default 30 days, adjustable from 1–99 days), skipping them from daily routes and stopping new stops until they pay. Marking a customer as Do Not Suspend overrides this, so service continues uninterrupted even if the account falls behind. This option is intended for trusted commercial customers or customers on special payment terms. |
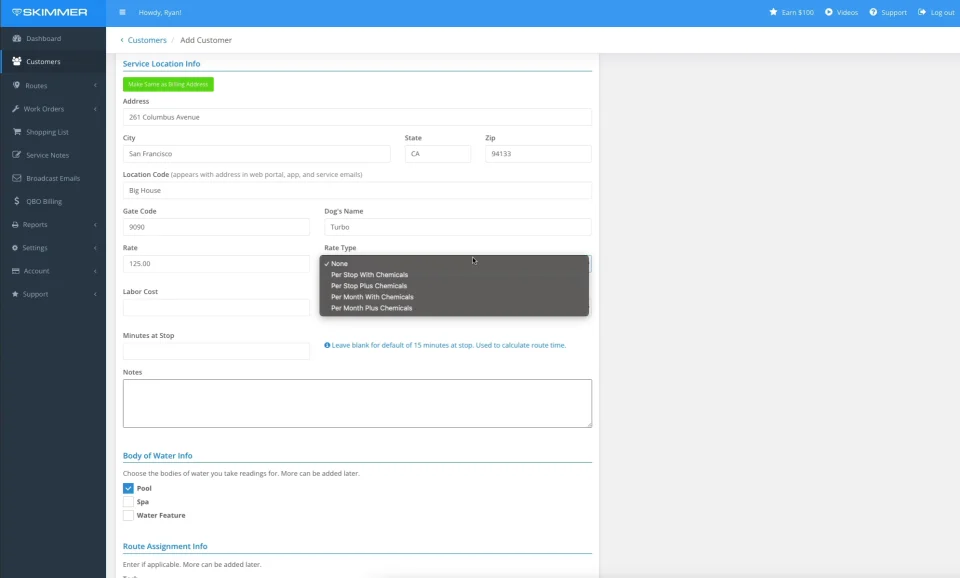
Service location info
| Field name | Required | Description |
|---|---|---|
| Address | Yes | Enter the service location if it's different from the billing address, or click the button to copy the billing address. |
| City | ||
| State Abbr. | ||
| Zip | ||
| Location Code | No | Enter a location code if you want a unique label for this location. Location codes appear on service emails to the customer. |
| Gate Code | No | Enter a gate code, dog's name, or other details techs can see for this location. |
| Dog's Name | ||
| Rate | No | Enter the rate you're charging for standard service at this location. |
| Rate Type | Yes | Choose a rate type: per stop applies the rate to each completed service, and per month applies the rate once per billing period regardless of how many stops you complete. |
| Labor Cost | No | Enter a labor cost and choose a labor cost type (per stop or per month) if you're paying the tech per job. |
| Labor Cost Type | Yes | |
| Minutes at Stop | No | Enter minutes at stop if this location typically takes longer or shorter than the default duration used to estimate route times. |
| Sales Tax Group | No | Select a tax group for this location, if you've set up custom tax groups. |
| Notes | No | Enter location notes for anything you want techs to know. Techs can see this box. |
Body of water info
| Field name | Required | Description |
|---|---|---|
| Pool | No | Select the bodies of water at this location. |
| Spa | ||
| Water Feature |
Route assignment info
| Field name | Required | Description |
|---|---|---|
| Tech | No | Add a route assignment now if you're ready to schedule the customer, including tech, service day, frequency, start date (Start On), and an end date (Stop On) if service is for a limited time. |
| Day of Week | ||
| Frequency | ||
| Start On | ||
| Stop After |
- Click Save.
View and edit a customer's information
- From the Customers page, click a customer's name.
- From the customer profile, you can:
- Review account information, tags, and options, including payment methods, account balance, billing history, and service text usage.
- Review or update the account's activity log.
- Update the service location. Click Edit in the Service Location section.
- Add a service location. Click Add in the Service Location section.
- Update customer details. Click Edit next to the customer's name.
- Attach photos. Click the Photos tab to attach photos of the backyard or pool equipment.
- View body of water details. Click the Pool, Spa, or Water Feature tab.
- Click Save at the bottom of the page to save your changes, or click Back to return to the Customers page.
Mark a customer inactive
- From the customer profile, click Edit in the Customer Info section.
- Click Set as Inactive to filter this customer out of your active list without deleting their data.
- The Make <customer name> Inactive window lets you uncheck the default actions applied to inactive accounts. Uncheck any action you want to omit:
- Delete route assignments
- Delete recurring work order schedules
- Delete unfinished work orders
- Delete work order reminders
- Delete tags
- Delete draft orders
Note: Deactivating a customer account hides billing items that haven't been invoiced and removes the customer's portal access.
- Click Set as Inactive to confirm.
To resume service later, open the customer's account, click Edit, and set the status back to Active.
Delete a customer account
Warning: Deleting permanently removes all customer data, service history, portal access, and any items that haven't been invoiced. The delete option is only available if the account has no service history or invoices. Deletions cannot be undone.
- From the customer profile, click Edit in the Customer Info section.
- Click Delete Customer.
- In the Delete this customer window, click Delete.
Review or update a customer's activity log
The Recent Activities section of the customer profile lets you review the chronological timeline of events Skimmer logs automatically, such as status changes, payment method updates, autopay changes, invoices and payments, quote milestones, and suspension or reactivation.
System-generated activity entries can't be edited or deleted, since they serve as an audit trail. Each entry shows the activity title, any additional details, who created it, when it happened, and clickable links to related invoices, quotes, or jobs.
- From the customer profile, locate the Recent Activities section.
- From this section, you can:
- Click Add to manually log an interaction Skimmer doesn't track automatically.
- Click Edit to change a manually created activity entry.
- Click View all to see the full activity log.