
Marketing Suite - Campaigns and Reviews
Tier: Add-on
Permissions: Can access Marketing Suite
Demos:
- Introducing Marketing Suite!
- Marketing Suite - Email/SMS Campaign Setup
- Segments - Email/SMS Campaigns
- Broadcasts - Email/SMS Campaigns
- Automations - Email/SMS Campaigns
- Marketing Suite - Reviews Setup
- Insights - Email/SMS Campaigns
Marketing Suite is an add-on that helps you reach your customers and manage your online reputation without leaving Skimmer. It includes the following products:
- Campaigns - pre-built email and SMS automations, plus tools to build your own one-time broadcasts.
- Reviews - automated Google review requests, with optional private feedback collection first.
These products run on your real Skimmer customer and job data, so you don't need to export a customer list or manage a separate marketing tool.
Note: Turning on the trial for either Campaigns or Reviews unlocks setup for both. You still choose separately whether to activate each one.
SMS consent
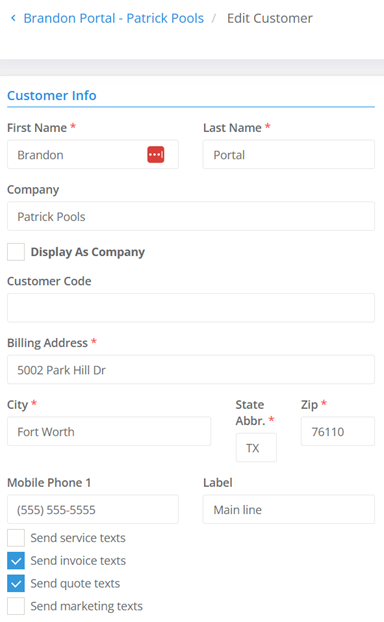
To receive Campaign or Review texts, customers opt in to marketing texts. You can review a customer's status from the Customer Info section of the Edit Customer page. Customers with a check next to the Send marketing texts option (under the Mobile Phone 1 field) have opted in. For new customers, this field defaults to unchecked.
Note: If a customer opts out of marketing texts, they cannot be opted back in.
What the Marketing Suite does
| Feature | What it means for you |
|---|---|
| Pre-built email and SMS automations | Ready-to-use campaigns (like win-back series and seasonal reminders) start working as soon as you review and turn them on. |
| AI-drafted content | Generate subject lines, copy, and images from a short description instead of starting from a blank page. |
| Segments | Group customers by criteria like service history or location, using pre-built filters or a plain-English AI segment builder. |
| Broadcasts | Send a one-time email, text, or both to a segment or your full customer list. |
| Test sends and previews | Send a test message to yourself, or preview it filled in with a specific customer's information, before it goes out for real. |
| Dedicated marketing email and phone number | Keeps marketing sends separate from invoice and appointment messages, protecting deliverability for both. |
| Revenue-tied analytics | See opens, clicks, and — with Skimmer Payments turned on — which messages led to an actual sale. |
| Automated Google review requests | Every completed job can trigger a review request with no manual follow-up. |
| AI-drafted review replies | Cuts down the time it takes to respond to incoming reviews. |
What Marketing Suite doesn't do
- It doesn't let you build a brand-new automation from scratch today. You can request one, edit the content of the automations Skimmer provides, or clone an existing one as a starting point.
- It doesn't show revenue attribution unless your account processes payments through Skimmer.
- It doesn't support multiple business locations under one Google Business Profile connection if those locations run as separate Skimmer accounts — each account connects to its own profile.
Before you begin
Before you start setup, check the following:
- Google Business Profile ownership. To set up Reviews, you need to be an owner (not just a manager) of your company's Google Business Profile. If someone else manages it, get their help before you start.
- Website access (optional). Skimmer can pull your logo, brand colors, and business information directly from your website. If you'd rather enter this information yourself, have it ready.
- Custom domain access (optional). If you want marketing emails to send from your own domain instead of a Skimmer-provided address, you'll need access to whatever service hosts your website (for example, GoDaddy). Skimmer connects to it securely to finish setup. You don't need to edit any DNS records yourself.
What Skimmer recommends
- Review every pre-built automation before you turn it on. Skimmer pre-loads industry-specific campaigns with example offers (for example, a seasonal discount). Check that the offer, wording, and pricing actually match what you provide before activating.
- Use a dedicated marketing email address for Campaigns. Skimmer gives every account a marketing-specific email address by default. Sending marketing email separately from your invoice and appointment emails protects your transactional email from landing in spam.
- Send yourself a test before you turn something on. You can send a test email or text to your own inbox, or preview a message filled in with a specific customer's information, so you can see exactly what your customers will see.
- Turn on Skimmer Payments if you haven't already. Campaign and broadcast analytics can only tie a send to a real sale when your account processes payments through Skimmer. Without it, you'll see delivery and open data but not revenue attribution.
- Pick the Reviews flow that matches your goal. Choose private feedback before a Google request if protecting your public rating matters most. Choose Google review requests only if you want to maximize review volume regardless of score.
Setting up Campaigns (email and SMS)
Note: Every email and text automatically includes an unsubscribe link (or text opt-out instructions) and your business's required contact information in the footer, so you stay compliant with anti-spam laws without extra setup.
- From the left navigation menu, click the Campaigns option.
- The Customize Your Brand page gives you the following options:
- Pull branding from your website. Enter your website address and click Scan my website to pull your logo, brand colors, and business details automatically.
- Enter your branding manually. Fill in the Brand website, Brand Name, and Primary Color fields. Then, upload your company logo.
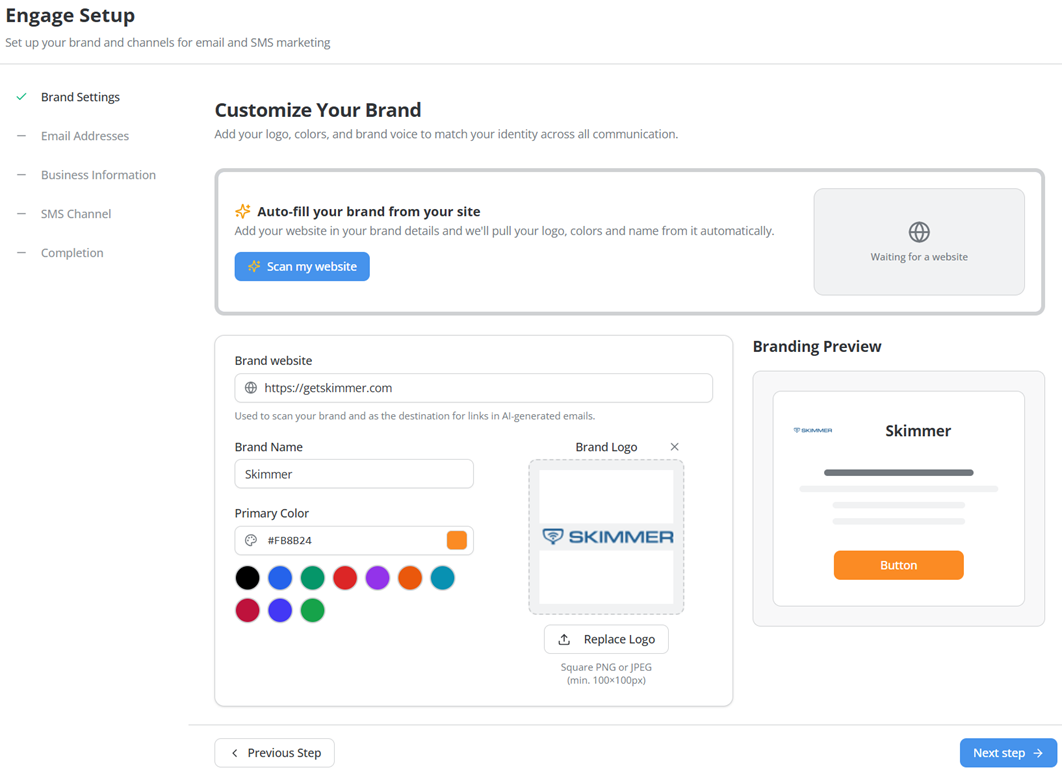
- After you review your branding information, click the Next step button.
- From the Setup your new marketing email address page, choose how marketing emails will be sent by clicking the radio button next to one of the following options:
- Use the sending address we set up for you – Click this option to use the dedicated marketing email address Skimmer provides (for example, marketing@yourcompany.mypoolportal-mail.com).
- Send from your own domain – Click this option to connect your own domain so emails send from your company's address.
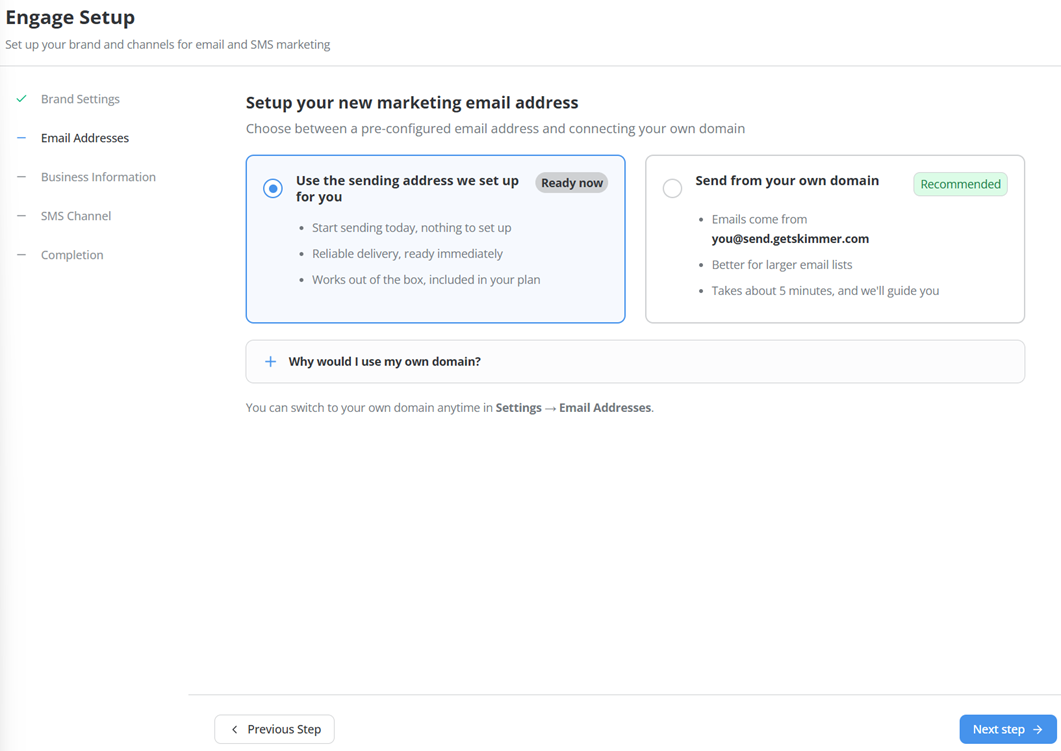
- Click the Next step button to continue setting up your sending email address.
- If you selected Use the sending address we set up for you, the Your managed sending address screen lets you fill in the following options: Sending email address, Display name, Reply-to-email.
- If you select Send from your own domain, the next screen allows you to fill in the same options and click the Connect button to log into your website host. Skimmer verifies and configures the domain automatically.
- Click the Next step button to move to the Business Settings page.
- Fill in your business name and address.
- Click the Next step button to move to the Want to reach your audience via SMS page.
- Click one of the following buttons:
- Not now – Click this button to complete the setup process. Go to step 13.
- Yes, let's setup SMS – Click this button to move to the Connect Your SMS page. Go to step 10.
- Click the Request approval or the Start application button to begin filling in the information required to set up a dedicated marketing number for text messages. You'll fill in these fields across three windows. Click the Continue button when you complete each one.
Step 1: Business Verification
Field Required? Tip Legal business name Required Enter the name exactly as it appears on IRS records, including punctuation and entity type (LLC, Inc., etc.). Skip the doing business as (DBA) or brand name. Business type Required Select the option from the dropdown that matches the business's legal structure. Business registration type Required Select the type of registration number being provided. Business registration number Required Enter the number tied to the IRS record for this business. Step 2: Business Address
Field Required? Tip Business address Required Enter the registered business address used for SMS toll-free number review. Business address line 2 Optional Leave blank if it doesn't apply. City Required State/Province Required ZIP Code Required Country Required Select from the dropdown. Step 3: Authorized Contact
Field Required? Tip First Name Required Enter the first name of the person who can represent the business during SMS registration. Last Name Required Email Required Use an email address the authorized contact checks regularly, since the SMS provider may reach out for follow-up. Contact Phone Required Select the correct country code before entering the number. - After you finish filling out the SMS information windows, review your entries in the Review & Submit window and click Submit to approve sending the application to the SMS provider.
The Connect Your SMS page confirms that your request is Pending Review. Skimmer automatically requests a dedicated marketing phone number for text messages, separate from your regular customer communications. This typically completes within 48 hours but can take up to 7 days while the number registers with the carrier registry. There's nothing further for you to do while it processes. - Click the Next Step button.
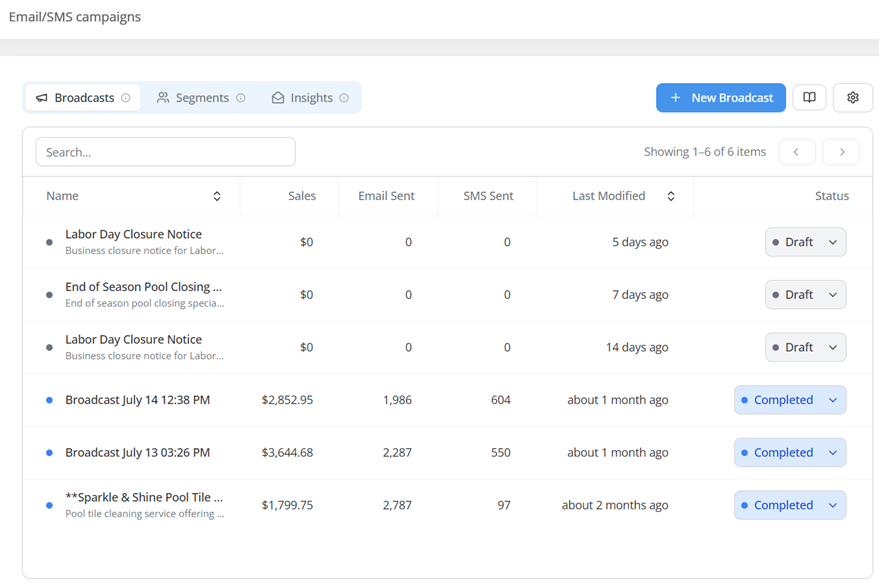
- From the You're All Set page, click Go to dashboard to review the preloaded campaign templates on the Email/SMS campaigns page.
Skimmer loads a set of ready-to-use email and SMS automations (for example, a win-back series for customers with no recent service). Open each one to review and edit the content before turning it on.
What's next?
Now that you've set up Campaigns, you can:
- Build segments – Segments are groups of contacts with shared characteristics or behaviors, such as "customers who bought in the last 60 days" or "subscribers who haven't opened an email in 3 months."
- Create broadcasts and automations – Broadcasts are one-time messages sent to a specific audience segment at a scheduled time. Automations run continuously and trigger based on contact behavior or dates.
- Monitor your metrics - See how well your broadcasts and automations are doing.
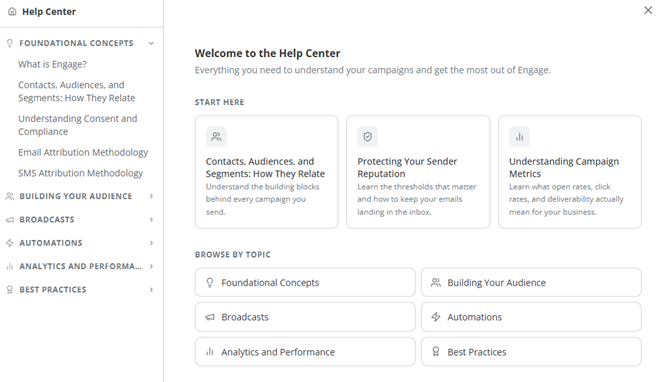
Use the embedded Help Center for instructions as well as best practices. Open the Help Center by clicking the open book icon in Skimmer Campaign pages.
Setting up Reviews
- From the left navigation menu, click the Reviews option.
- After you read the details in the How It Works window, click the Get Started button.
- In the Choose approach page, pick one of the following options:
- Ask for private feedback first, then a Google review – customers rate their service from 1 to 10. A 9 or 10 sends them straight to your Google page. Anyone who scores lower tells you what went wrong and still gets the Google link.
- Ask for a Google review only – ask every customer for a public review, regardless of feedback score.
- Ask for private feedback only – no Google reviews, just a request for feedback that you can use internally.
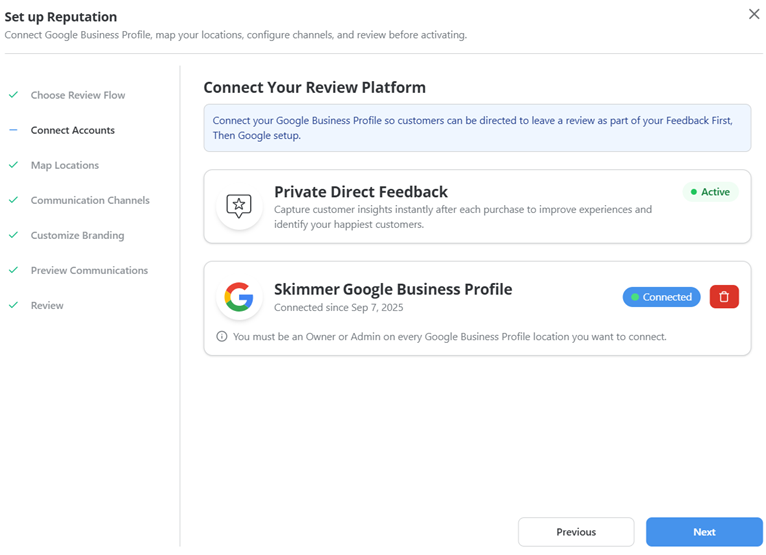
- Click the Next button to move to the Connect Your Review Platform page.
- Click the Google Business Profile option to log in to your Google account and connect your Google business profile to Skimmer reviews. This enables the posting of Google reviews from your review requests. You must be an owner or admin for the Google account to connect it to Skimmer Reviews.
- Click the Next button to move to the Map Your Locations page.
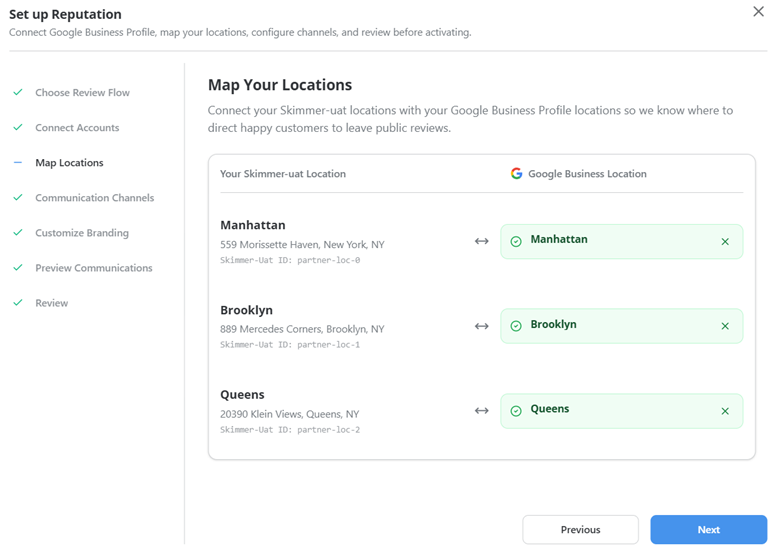
- If your company has more than one business location, the Map Your Locations page allows you to map your business address to a Google business location by clicking the field and selecting from the drop-down list.
Skimmer handles this mapping automatically for single-location companies.
- Click the Next button to move to the Configure Channels page.
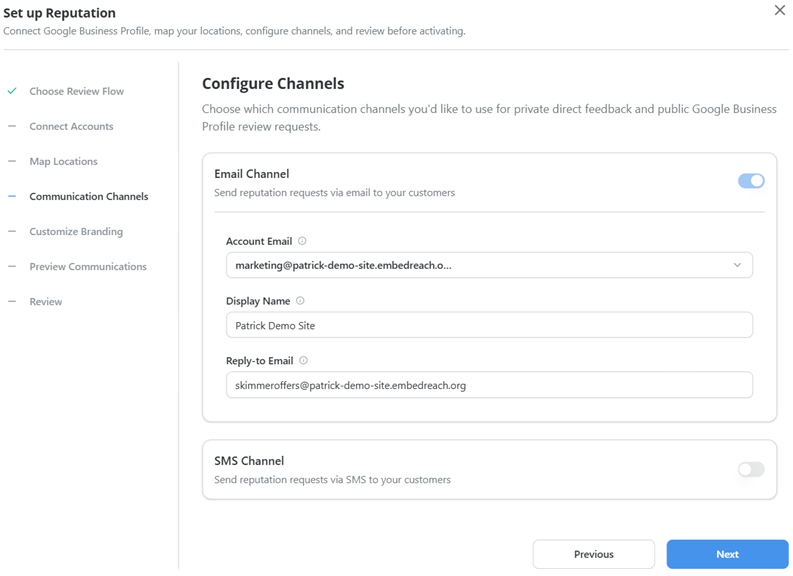
- Use the Configure Channels page to fill in your account email, display name, and reply-to-email. Skimmer Reviews uses this information to send review requests. If you already set up Campaigns, Skimmer uses your Campaigns information to fill in these fields.
- You can also toggle on the SMS Channel option if you want to send review requests by SMS.
- Click the Next button to move to the Customize Branding page.
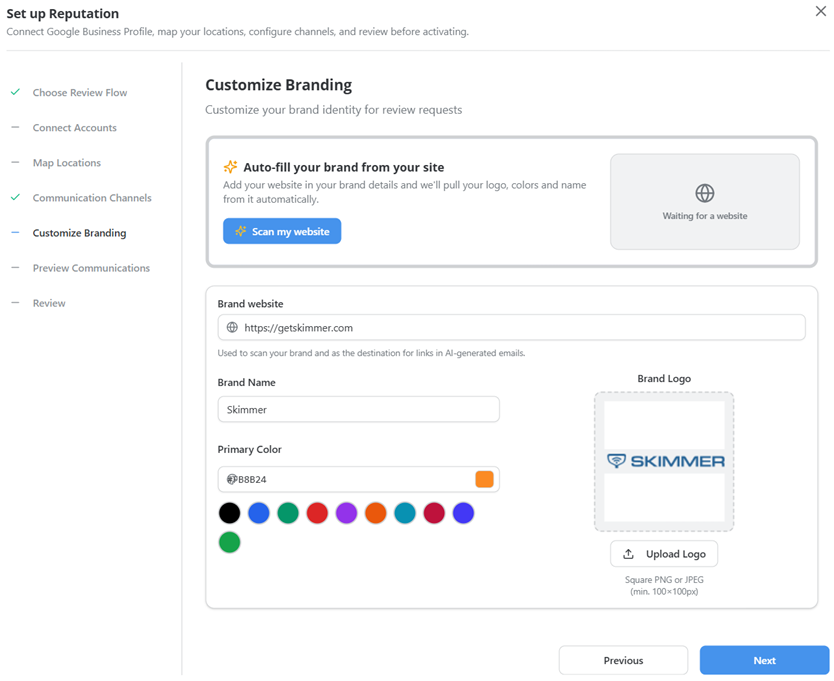
- The Customize Branding page allows you to:
- Pull branding from your website. Enter your website address and click Scan my website to pull your logo, brand colors, and business details automatically.
- Enter your branding manually. Fill in the Brand website, Brand Name, and Primary Color fields. Then, upload your company logo.
If you already set up Campaigns, Skimmer uses your Campaigns information to fill in these fields.
- Click the Next button to move to the Preview Communications page.
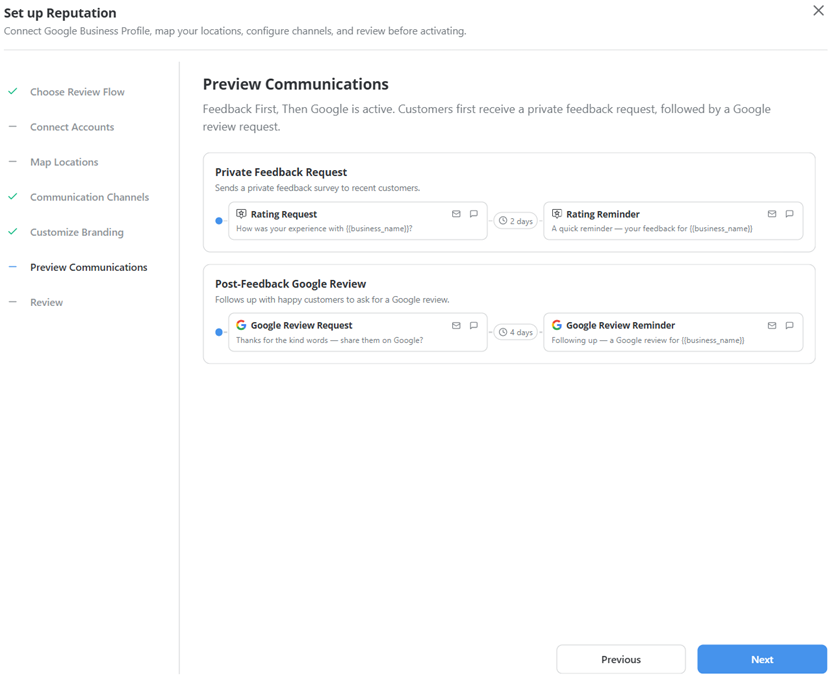
- The Preview Communications page allows you to review and edit message templates provided by Skimmer. You can then customize these templates as needed.
- Click the Next button to move to the Review & Activate page.
- Review your configuration information. If you need to make changes, use the left navigation menu to go back.
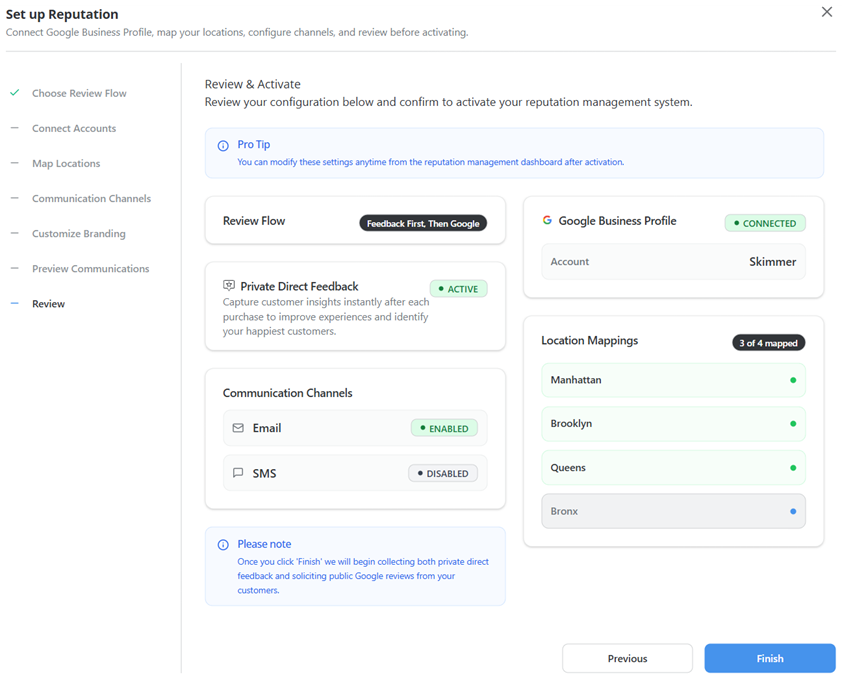
- Click Finish to complete the setup process and turn on reviews.
Once active, Skimmer automatically requests feedback and reviews going forward. There's nothing to remember to send.
What's next?
Now that you've set up Reviews, use the Reviews page to monitor your customer feedback and follow up with customer outreach or process changes.
Check your analytics a few weeks after launch, not just on day one — automations and review requests need time to reach enough customers to show a meaningful trend.
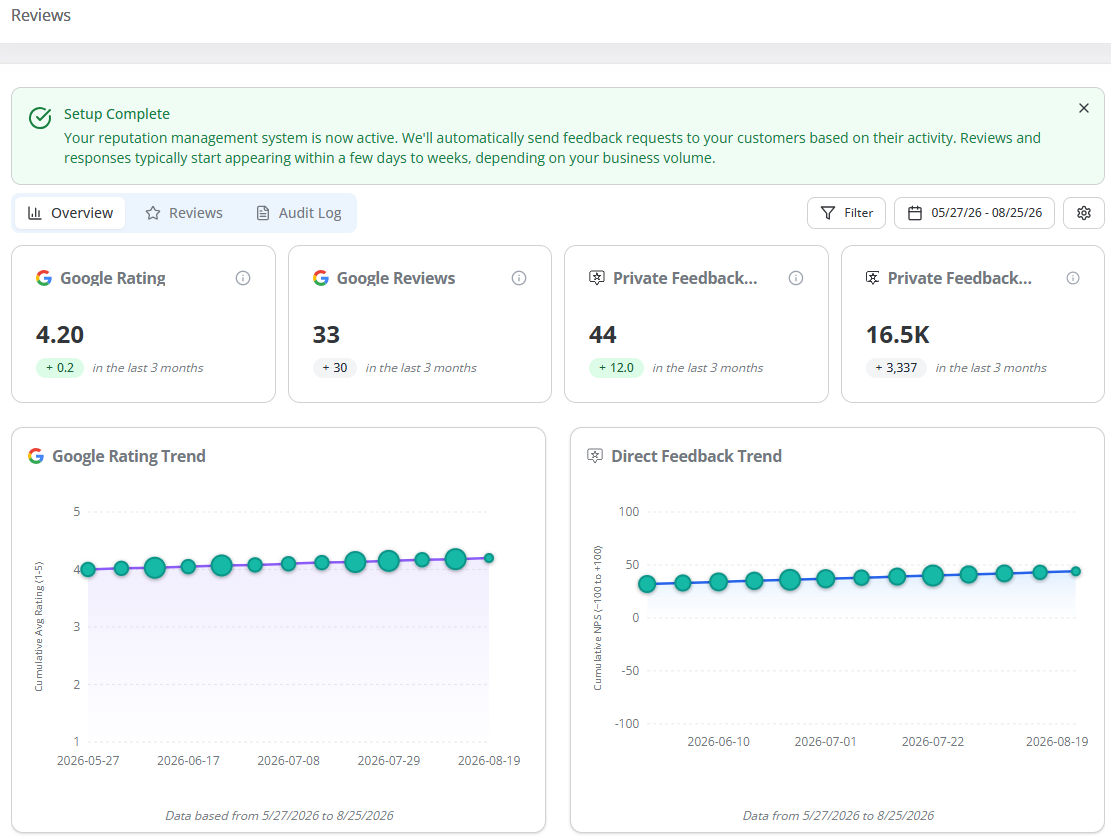
The Reviews page has three tabs:
- Overview – charts your Google and private review trends, giving you a quick visual as well as the supporting numbers. Hover on chart points for more details and info icons for number calculations and meaning.
- Reviews – lists customer review details. From reviews, you can:
- Link a customer record to a review. Click the Link Review option to tie a customer review to a customer profile. Customers with a linked Google review do not receive future review requests.
- Remove a review link. If a review was linked in error, click the Review Linked option to remove the connection.
- Reply to a review. Click the Click to reply option to send a response to a customer review. If you've already sent a response, click the View Reply option to review the contents.
- Locate a review. The Search field lets you search by keyword.
- Audit Log – tracks review requests and responses.
Each of these tabs also contains the following buttons/fields:
- Filter button – filters by location, review type, or sentiment.
- Date range picker – filters by preset time periods: last 7 days, last 30 days, last 90 days, last year, or all time.
- Settings button – displays the Update Reputation Settings window. This lets you update the settings you selected when setting up Reviews.
Marketing Suite FAQ
Getting started
What is Marketing Suite?
Marketing Suite is Skimmer's customer communications tool, bundling two parts: Campaigns, for email and SMS, and Reviews, for requesting and managing Google reviews. Campaigns give you three ways to reach customers: dynamic audience segments, automated message sequences, and one-time broadcasts.
Can I get Campaigns without Reviews, or vice versa?
No. Campaigns and Reviews come together as one bundled add-on.
What brand do my customers see when they get a message?
Yours. Campaigns and review requests are white-labeled to your brand, with your colors, sender name, and domain.
Will this spam my customers?
No. You control what gets sent, when, and to whom. AI can draft content, but nothing goes out without your review and approval. The pre-built automations are templates you turn on and off, not a default sending schedule.
Can I use Marketing Suite to reach prospects?
No. Marketing Suite is designed to reach existing customers or people who have already expressed interest in your business, not for cold outreach.
What's the fastest way to see results with Marketing Suite?
Activate the pre-built automations. They're already configured and ready to go, and your customers are automatically included in the right segments to power them. Review the content, then let it run or adjust it to match your brand voice.
Can I edit the pre-built campaign templates?
Yes. Review the content of every message before you turn it on. The pre-built examples include sample service packages and promotions that may not match your business, so confirm the details, pricing, and any offers before activating an automation.
Does Marketing Suite work with contacts who haven't opted in?
No. Marketing Suite works with contacts who have already opted in. It's built for retention and relationship marketing with customers who already know your business.
Do I need to manually refresh my audience lists before sending?
No. Segments are dynamic and stay up to date on their own.
Contacts, segments, and campaigns
What's the difference between contacts, segments, and campaigns?
- Contacts are individual customer records, synced automatically with properties like name, email, phone, and purchase history.
- Segments are dynamic filters that group contacts by shared behaviors or characteristics. Membership updates automatically as contact data changes.
- Automations and broadcasts are the messages sent to a segment. Automations are ongoing, triggered sequences. Broadcasts are one-time sends.
Can a contact belong to more than one segment?
Yes. A single contact can belong to multiple segments at the same time.
Consent and compliance
What's the difference between email and SMS consent requirements?
Email falls under CAN-SPAM, which allows opt-out by default: you can email a contact without prior consent as long as every message includes an unsubscribe link and you honor opt-outs within 10 business days. SMS falls under the TCPA, which requires explicit opt-in before you send any marketing text.
What happens if I send SMS without documented consent?
You risk fines of $500 to $1,500 per message. Email violations under CAN-SPAM, like missing unsubscribe links or deceptive subject lines, carry fines up to $51,744 per email.
How does Marketing Suite handle unsubscribes?
Automatically. When a customer clicks unsubscribe (email) or replies STOP (SMS), Marketing Suite flags them immediately and suppresses all future sends on that channel. No manual step is needed.
Can a contact resubscribe after opting out?
Yes, but only if they initiate it. They can text START to resubscribe to SMS, or use a new opt-in form for email. You can't resubscribe a customer yourself. They need to ask you directly, and you'll need to walk them through opting back in.
Does SMS work right away?
Email and Reviews are ready right away. SMS needs a business verification and dedicated phone number first, which takes 3 to 7 business days to process once you request it in Settings. This turnaround protects marketing compliance and can't be sped up.
Can customers reply to my texts?
No. SMS messages in Marketing Suite are one-way. For email, you can set up a reply-to address to capture responses — choose one whose inbox you check often.
Building your audience
What is a segment?
A segment is a dynamic filter that automatically groups contacts based on properties or behaviors. As contact data changes, segment membership updates in real time.
How is a segment different from a static list?
A segment is rule-based and updates automatically. A static list is a fixed snapshot that only changes when you manually add or remove contacts. Use segments for ongoing automations, and static lists for one-off sends to a fixed group.
What can I filter a segment by?
Three categories: contact properties (location, subscription status, custom fields), purchase behavior (last order date, total spend, order count), and engagement behavior (opened an email, clicked a link, replied to SMS).
What data does Marketing Suite use to build audiences?
Live Skimmer customer and job data, not an imported list. Describe a segment in plain English, like "customers inactive for 6+ months," and the audience builder pulls from your synced Skimmer fields.
What fields can I build a segment from?
Customer billing address, city, state, and ZIP code, company, creation date, customer ID, inactive status, lead status, email, first name, last name, and phone. For example, build "active customers in [city], [state]" to send a storm cleanup offer, or "inactive customers in [zip code]" to re-engage an area where you want more route density.
Does the AI send campaigns on its own?
No. If you choose to use it, AI drafts subject lines, copy, and images in under a minute, but you still review and send the message yourself. It's not an autopilot flow.
Broadcasts
What is a broadcast?
A one-time message sent to a specific audience segment at a scheduled time. Use broadcasts for promotions, announcements, and newsletters.
How is a broadcast different from an automation?
A broadcast is manually created and sent once to whoever qualifies at that moment. An automation runs continuously in the background and sends to each contact automatically when they meet a trigger condition.
When is the audience for a scheduled broadcast determined?
At send time, not at scheduling time. The segment updates to include or exclude contacts who join or leave it between scheduling and sending.
Do I need to manually remove unsubscribed contacts before sending?
No. Marketing Suite automatically excludes anyone who has unsubscribed from email or replied STOP to SMS.
Automations
What are automations?
Campaigns that send themselves. Once active, an automation monitors your contacts and sends the right message to each person automatically when they meet a trigger condition, based on a date or an action.
What are the two types of automation triggers?
Date-based triggers, tied to a date on a contact's record like a birthday or renewal date, and event-based triggers, tied to something a contact does, like a purchase or a form submission. You can add delays to event-based triggers to time the message precisely.
Do new contacts automatically get included in existing automations?
Yes. Once an automation is active, it runs for every qualifying contact, including customers who join next month or next year. You don't need to update anything.
Reviews
How does Marketing Suite help me get more Google reviews?
After a completed stop, Skimmer automatically sends a review request. You don't have to remember to ask, and the automation runs continuously in the background.
How does Smart Review Routing work?
After a completed stop, Skimmer requests a review. Customers who report a good experience (9 or 10 rating) are routed to leave a public Google review. A rating of 8 or lower opens a comment box for feedback to be sent to your team. A Google link is still there if the customer wants to go ahead and post a review.
Why are only Google reviews supported?
Consumers choose Google more than twice as often as any other platform when searching for local business information, so it's the highest-impact place to focus.
Does it pull in reviews I already have on Google?
Yes. Marketing Suite pulls in your historical Google reviews.
Can AI help me respond to reviews?
Yes. AI drafts a reply tailored to the rating and the specifics of what the customer wrote, ready for you to review and post.
Account and billing
What happens to my campaigns and review routing if I cancel Marketing Suite?
They stop immediately upon cancellation.
Analytics and performance
What metrics does Marketing Suite track?
Sent, open rate, click rate, bounce rate, unsubscribe rate, and complaint rate for every broadcast and automation.
What's a healthy open rate?
20% or higher is solid, and 30% or higher is strong. Below 15% suggests a subject line or list quality issue worth investigating.
What's a healthy click rate?
2% or higher is typical, and 5% or higher is strong. A high open rate paired with a low click rate usually means the subject line worked but the content or call to action didn't convert.
What complaint rate should I stay under?
0.1%. Crossing that threshold can get your sending domain flagged by Gmail and other major providers, which affects delivery even for engaged contacts.
How is SMS performance measured differently from email?
SMS centers on delivery confirmation, link clicks, and opt-outs rather than opens. A healthy click rate for a promotional SMS is typically 5–15%. A delivery rate below 90% points to stale numbers, incomplete carrier registration, or content filtering.
What causes SMS carrier filtering?
Carriers block messages that look like spam: high-volume sends from unregistered numbers, spam-like content, or messages sent without A2P 10DLC registration (the carrier registration required for business texting). Registering your number is the most effective way to improve delivery.
Best practices
How do I protect my sender reputation?
Only send to contacts who genuinely opted in, remove hard bounces immediately, suppress contacts who haven't engaged in 6 or more months, and keep your unsubscribe link visible. Monitor your metrics after every send so you can catch problems early.
What content factors affect whether an email reaches the inbox?
Subject lines without spam trigger words or excessive punctuation, at least 500 characters of text with images balanced by content, minimal hyperlinks with no URL shorteners, and a visible unsubscribe link near the top and bottom of the message.
When should I suppress a contact from my list?
After 6 months of no engagement, after a hard bounce, or after they don't respond to a dedicated re-engagement campaign.