
Ads Attribution
Ads Attribution shows you which ads actually produce paying customers, by tying your Google Ads and Meta ad spend to real revenue recorded in Skimmer. In Skimmer, you'll find it under the Ads Attribution option in the left navigation.
What Ads Attribution does
| Feature | What it means for you |
|---|---|
| Ad platform account connections | See spend and campaign-level metrics from every connected ad platform in one place, without switching between tools. |
| Attribution snippet for pages you host outside Skimmer | Tracks visitors on your own landing pages and contact forms, so fewer leads and sales go untracked. |
| Consolidated performance dashboard | Combines ad platform data, attribution data, and your Skimmer transaction data into one picture of what's working. |
| Revenue attribution | Connects a campaign to the actual customers and revenue it produced — not just clicks. |
| Ad recommendations | Recommends where to shift budget based on ad performance. |
| Ad spend improvement (optional) | Sends your transaction data back to Google and Meta so their bidding and targeting improve on their own. |
What Ads Attribution doesn't do
- It doesn't let you create, edit, or fund ad campaigns from inside Skimmer. It's measurement, not ad buying.
- It doesn't connect to ad platforms other than Google Ads and Meta right now.
- It doesn't attribute revenue from jobs or payments that aren't recorded in Skimmer.
- It doesn't fully track attribution without the tracking snippet installed on any pages you host outside Skimmer. Without it, you'll see gaps in your reporting.
Before you begin
Before you start setup, check the following:
- Your plan. Ads Attribution is included with Skimmer's Enterprise plan. It isn't available on other plans.
- Admin access to your ad accounts. To connect Google Ads, you need access to the Google account tied to your Ads account. To connect Meta, you need Admin access to your Business Manager — advertiser-only access won't complete the connection.
- Website access (if you host pages outside Skimmer). If you run any landing pages, contact forms, or a scheduling widget outside Skimmer, you (or your webmaster) will need to add a tracking snippet to those pages.
What Skimmer recommends
- Skimmer invoicing and payments. Pros using Skimmer for invoicing and payments get the most out of Ads Attribution because they can easily see the link between ads and actual customer revenue.
- Install the tracking snippet site-wide, not just on your homepage. Visitors can land on any page from an ad, so every page needs the snippet to be counted.
- Confirm your Meta access before you start. Advertiser-only access will stop the connection partway through — you need Admin access to your Business Manager.
- Give it a day. Ad data starts syncing right away and the pixel starts tracking immediately, but your first analytics reports can take up to 24 hours to appear.
- Compare your return on ad spend (ROAS) to your margins, not to a generic benchmark. What counts as a healthy return depends on your product mix and cost structure, not on a single industry number.
Setting up Ads Attribution
- From the Marketing Suite section on the left navigation menu, click Ads Attribution.
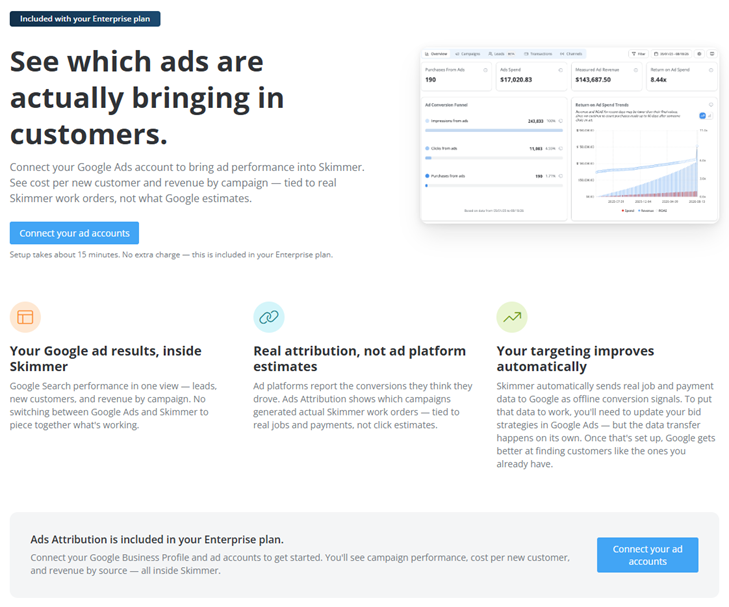
- Review the overview page, then click Connect your ad accounts. Setup takes about 15 minutes.
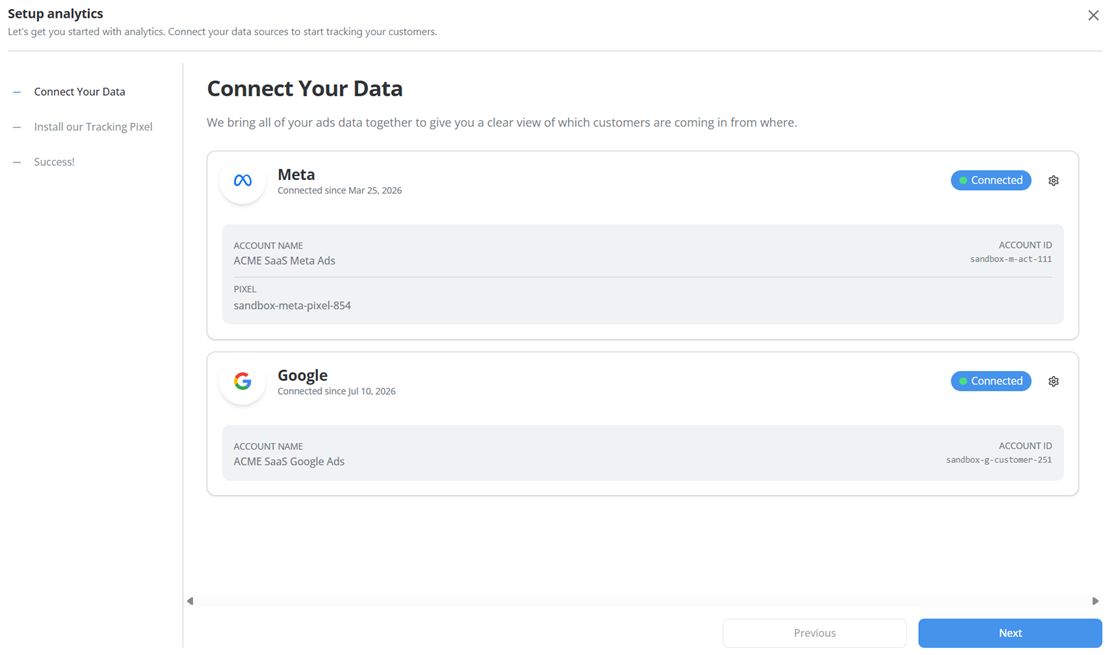
- On the Connect your data page, click Connect next to Meta. Sign in with the Facebook account that has Admin access to your Business Manager, grant the requested permissions, then select the Business Manager, ad account, and Meta Dataset you want to connect.
- Click Connect next to Google. Sign in with your Google account, grant the requested permissions, then select the Google Ads account you want to connect.
- Click Next to move to the Install our tracking pixel page.
- Copy the code from the Your tracking pixel box.
- Click the option that matches your website platform — Shopify, Google Tag Manager, HubSpot, WordPress, Squarespace, Wix, Webflow, Third-Party Systems, or Custom — then follow the instructions displayed on the page to paste the snippet into your site's HTML.
- Click Next to finish setup.
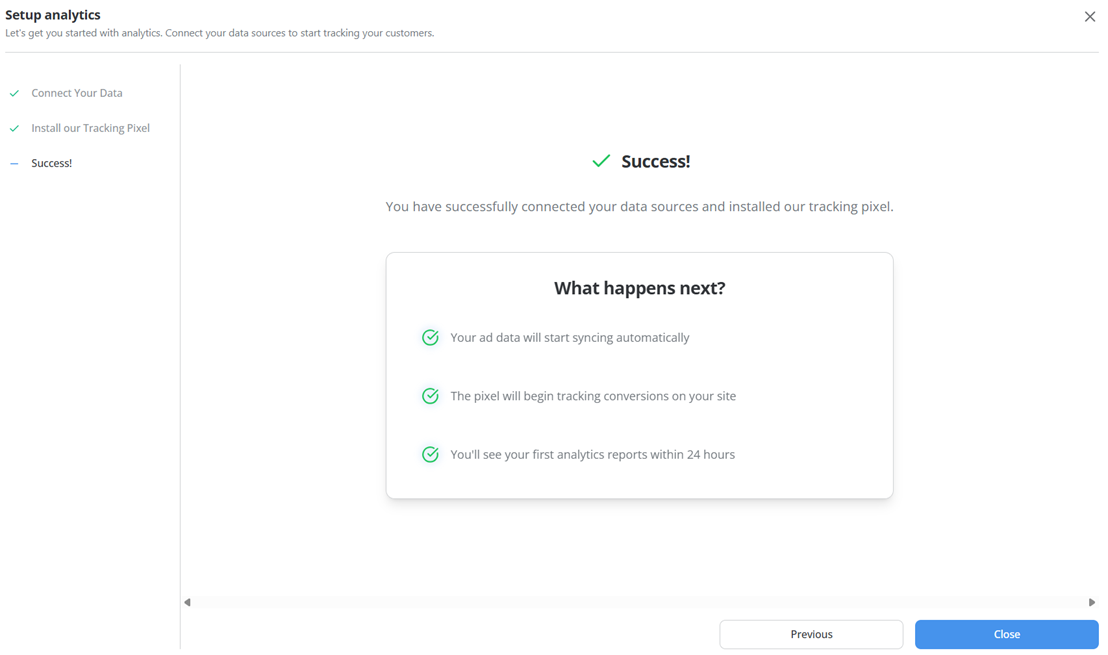
- Review the Success page confirming your data sources are connected and your tracking pixel is installed, then click Close.
Once setup is complete:
- Your ad data starts syncing automatically.
- The pixel begins tracking conversions on your site.
- You'll see your first analytics reports within 24 hours.
What's next?
Now that you've set up Ads Attribution, you can:
- Review your dashboard — Check the Campaigns, Leads, Transactions, and Channels tabs to see which campaigns are producing real revenue, not just clicks.
- Opt in to ad spend improvement — Choose to send your transaction data back to Google and Meta so their bidding and targeting improve on their own.
- Set up call tracking — If your business takes bookings by phone, connect Google's native call reporting, CallRail, or Call Tracking Metrics so those calls count as conversions too.
- Let Skimmer build your Google Ads audience lists — Skimmer automatically creates customer lists in your connected Google Ads account for exclusion, retargeting, and lookalike targeting.
Use the embedded Help Center for instructions as well as best practices.
Reading your Ads dashboard
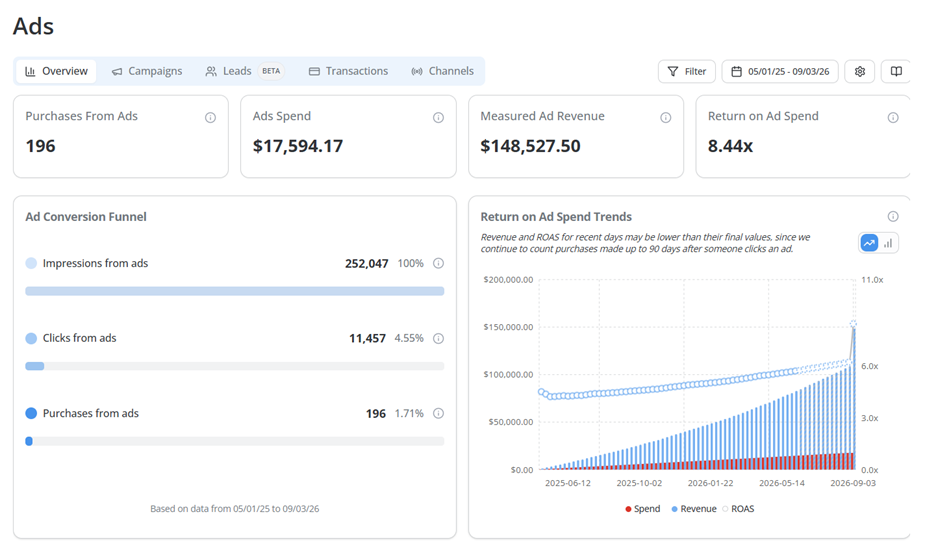
The Overview tab shows four headline numbers and two charts that give you the fastest read on how your advertising is performing.

| Metric | What it tells you |
|---|---|
| Purchases from ads | Completed sales we traced back to a marketing touchpoint. |
| Ad spend | Total amount spent on ads across your connected accounts in the selected date range. |
| Measured ad revenue | Revenue from purchases we could attribute to your advertising. |
| Return on ad spend (ROAS) | Measured revenue divided by ad spend — your return on every dollar spent. |
- Ad conversion funnel — shows the path from impressions, to clicks, to purchases, so you can see where interest is dropping off.
- Return on ad spend trends — charts spend and revenue side by side over your selected date range. Revenue and ROAS for the most recent days may still rise, since a purchase can be counted up to 90 days after the ad click that led to it.
Four more tabs sit alongside Overview, each answering a different question:
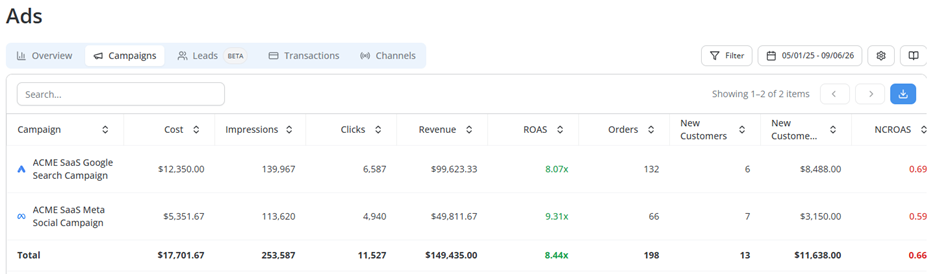
- Campaigns — breaks out spend, clicks, revenue, ROAS, and new customer revenue by individual campaign, so you can see which ones are worth scaling.
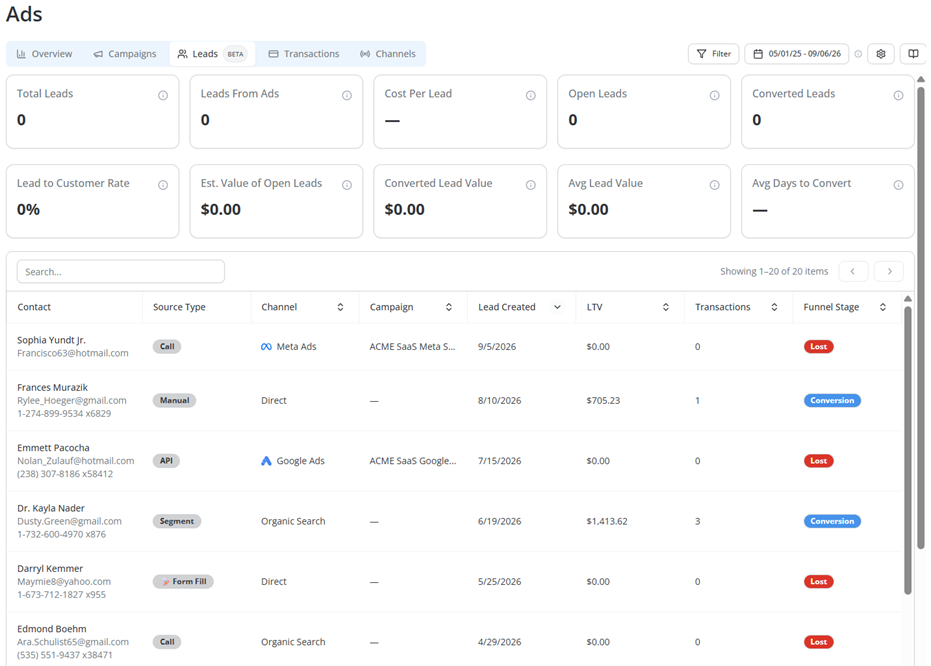
- Leads (beta) — shows people who filled out a form or called but haven't purchased yet, so you can spot interest before it turns into a sale.
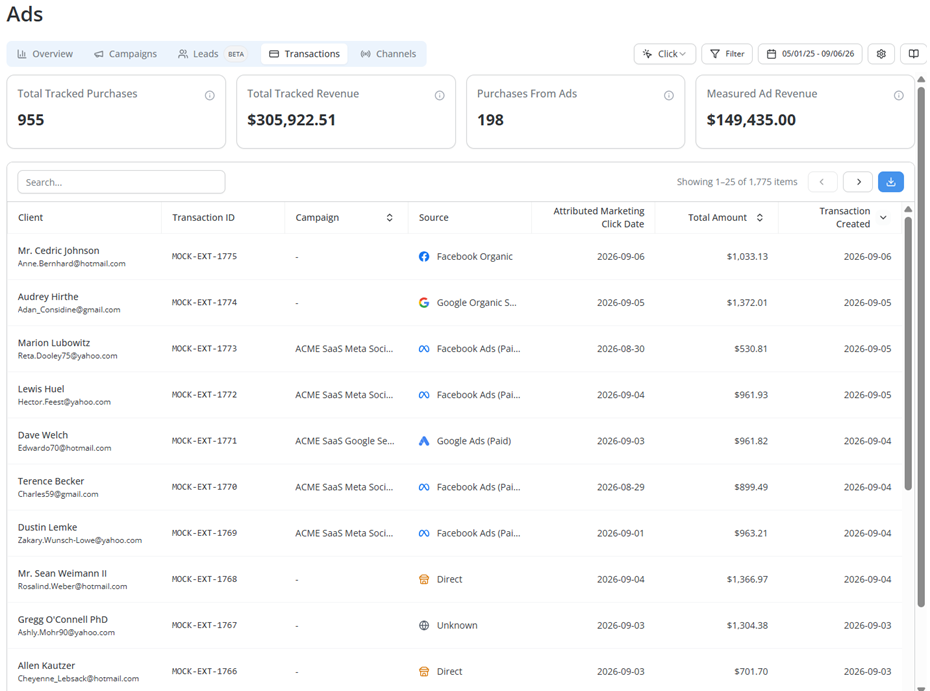
- Transactions — lists completed sales, each tied back to the campaign or source that produced it. This is where you measure ROAS.
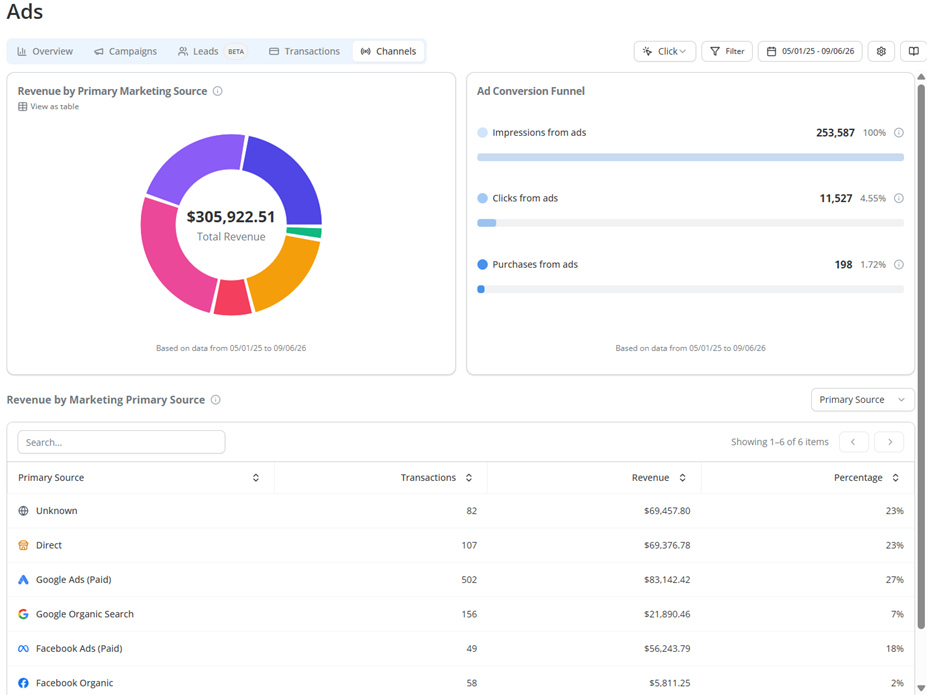
- Channels — breaks down revenue by source, channel, or campaign, so you can see which marketing sources are carrying your business.
Ads Attribution FAQ
What is ROAS?
Return on ad spend. It's revenue from ads divided by ad spend, so a ROAS of 3x means you earn $3 for every $1 you spend on ads. Higher is better, but there's no universal target — a business with thin margins needs a higher ROAS to break even than a business with high margins.
Why is my measured revenue lower than my total revenue?
"Measured" only counts purchases we can trace back to a marketing touchpoint. If a customer never visited your site, or their visit fell outside the 90-day tracking window, their purchase won't show up here even though it's still real revenue for your business. Don't compare the two directly — the gap is expected.
Why do some purchases show as "Unknown"?
A purchase shows as Unknown when we can't connect it to any marketing touchpoint — usually because the customer didn't visit your website in the 90 days before buying, they used different contact details when browsing versus buying, or the tracking snippet wasn't installed on the page where they converted. Installing the snippet site-wide is the most reliable way to reduce this.
What's the difference between a lead and a transaction?
A lead is a person who submitted a form or called but hasn't purchased yet. A transaction is a completed sale. The same customer can show up in both — first as a lead, then as a transaction once the sale closes.
Do I need to update my Google Ads bidding myself?
Yes, for now. Skimmer automatically sends your real job and payment data to Google as conversion signals, but you still need to update your own bid strategies in Google Ads to put that data to work. The data transfer happens on its own — the bidding changes don't.
Can I create or edit ad campaigns from Skimmer?
No. Ads Attribution shows you what your ads are producing — it doesn't buy or edit media. You still manage campaigns directly in Google Ads or Meta Ads Manager.
What ad platforms are supported?
Google Ads and Meta (Facebook and Instagram) at launch. No other platforms can be connected right now.
Who handles the ad and attribution data?
Reach, Skimmer's embedded partner, powers the dashboard and combines your ad platform data with the transaction data Skimmer shares with them. You control which accounts you connect, and sending your transaction data back to the ad platforms is optional and requires your explicit opt-in.