
Google Calendar Integration
The Google Calendar integration connects one Google Calendar to Skimmer. It can send your customers a calendar invite for each new work order, and it can turn events on your calendar into Skimmer work orders.
It works well if you get jobs from another system that shares to a Google Calendar, like a short-term rental booking platform.
Google Calendar is a marketplace integration. You add it to your subscription and set it up with a step-by-step wizard in the Integrations Center.
What Google Calendar can do
The integration runs two flows. Each one has its own on/off switch, and both start off.
| Flow | When it runs | What it does |
|---|---|---|
| Skimmer to Google Calendar | Every 15 minutes | Adds an event to your calendar for each new work order and invites the customer. Google emails the invite. |
| Google Calendar to Skimmer | Every 15 minutes | Creates a Skimmer work order for each new or updated event that has a customer as an attendee, then adds the work order's reference number to the event description. |
Tips & tricks
- Use a calendar just for Skimmer. When Google Calendar to Skimmer is on, any event that invites a customer's email can become a work order. Don't connect your personal or team calendar.
- Both flows match customers by their primary email in Skimmer. Keep those emails current.
- Skimmer to Google Calendar starts with work orders added after you turn it on. Its first check only records the work orders you already have and sends no invites.
- The reference number in each event description is how the integration avoids duplicates. Don't delete it from events.
- Each flow only picks up new items. Changing or deleting a work order in Skimmer doesn't update its invite, and changing an event after its work order exists doesn't update the work order.
- Both flows use the same calendar. Events that Skimmer adds already include a reference number, so they don't come back as new work orders.
Before you start
Note: If your company is on the Enterprise tier, contact your Skimmer customer success manager (CSM) for assistance before you begin configuring the Google Calendar integration.
You need:
- A Google account that can add and edit events on the calendar you want to use.
- The Can view the Integrations Center permission in Skimmer.
- An Enterprise subscription or the Google Calendar add-on. If you don't have it yet, see Add Google Calendar to your subscription below.
- A primary email on each customer you want to invite or match. Both flows match customers by email.
We recommend creating a new Google calendar just for Skimmer before you start. If you plan to turn on Google Calendar to Skimmer, this keeps personal and team events from turning into work orders.
Find your calendar ID
Skimmer asks for the ID of the calendar you want to connect. Do these steps in Google Calendar on a computer.
- Open Google Calendar.
- In the left sidebar, hover over the calendar you want to use.
- Click the three dots next to it, then click Settings and sharing.
- Scroll to the Integrate calendar section.
- Copy the Calendar ID. For your main calendar, the ID is your Gmail address. Other calendars have IDs like abc123@group.calendar.google.com.
Keep the ID handy. You'll paste it into Skimmer during setup.
Add Google Calendar to your subscription
Google Calendar requires the Enterprise tier or a paid add-on. Its card shows Upgrade Required until you add it. You can buy the add-on and start setup in one pass.
If you add Google Calendar partway through your billing cycle, the charge is prorated and included on your next Skimmer invoice. Only users with the Can view payment method page permission can add it. If you don't have that permission, ask your account owner or an admin. If your account isn't on the Enterprise tier, contact your Customer Success Manager about upgrading.
- Click Integrations Center on the left navigation menu.
- Find the Google Calendar card. It shows Upgrade Required.
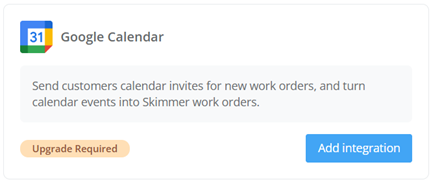
- Click Add integration.
- In the Add Google Calendar? window, review the monthly price.
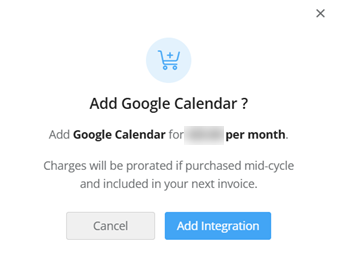
- Click Add integration to confirm. Skimmer adds Google Calendar to your subscription and opens the setup wizard.
Connect Google Calendar in Skimmer
The setup wizard has three steps, listed on the left side of the window: Connection, Skimmer to Google Calendar, and Google Calendar to Skimmer. Click Next to move forward or Previous to go back. Finish the first step, then turn on the flows you want. You can turn on one flow and leave the other off.
- Click Integrations Center on the left navigation menu.
- In the Available Integrations section, find the Google Calendar card and click Connect. If you just added Google Calendar to your subscription, the wizard is already open.
- On the Connection step, enter your calendar details:
- Calendar ID Variable: paste the calendar ID you copied. Both flows use this calendar.
- Calendar Time Zone: type a standard time zone name, such as America/New_York, America/Chicago, America/Denver, or America/Los_Angeles. Invites from Skimmer use this time zone. Changing it doesn't change events already on your calendar.
- Google Calendar Connection: connect the Google account that can edit your calendar. Connection is set to OAuth 2.0. Sign in to Google and allow access when Google asks.
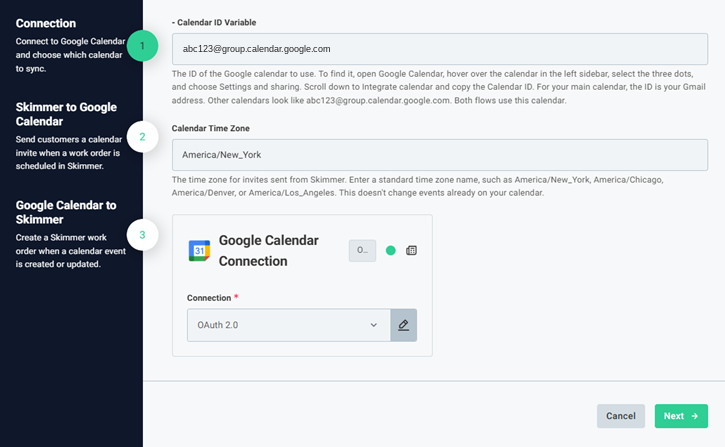
- Click Next.
- On the Skimmer to Google Calendar step, set up invites if you want them:
- Turn on Send Calendar Reminders to Customers. Leave it off to send no invites.
- Review the Work Order to Calendar Field Mapping. The defaults work as they are. See How each flow works below.
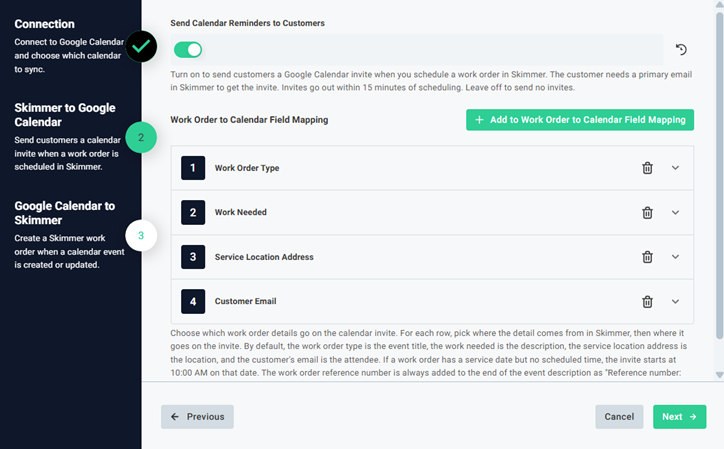
- Click Next.
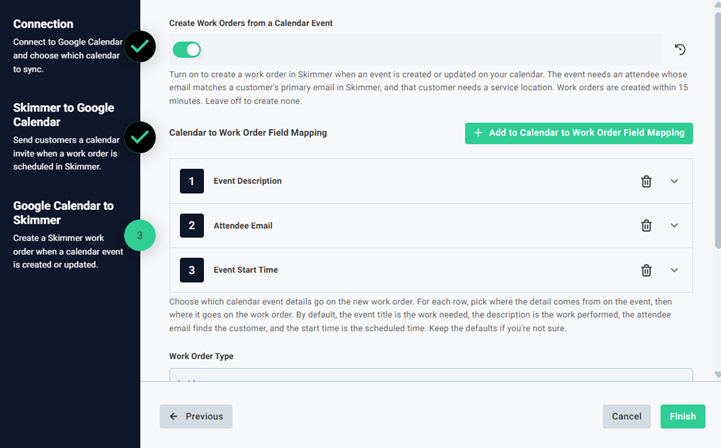
- On the Google Calendar to Skimmer step, set up work orders from events if you want them:
- Turn on Create Work Orders from a Calendar Event. Leave it off to create no work orders.
- Review the Calendar to Work Order Field Mapping.
- Select a Work Order Type. Skimmer uses it for every work order created from a calendar event. If a type is missing from the list, add it in Skimmer first, then reload the page.
- Select an Assigned User. This user is the lead technician on work orders created from a calendar event. You can reassign a work order in Skimmer at any time.
- Click Finish. The Google Calendar card changes to Connected and moves to the Connected Integrations section.
If you click Cancel or close the window before you finish, Google Calendar stays Available. Click Connect to start again any time.
Test your connection
- To test Skimmer → Google Calendar, add a work order for a test customer whose primary email you can check.
- Wait up to 15 minutes. The event appears on your calendar, and the invite arrives in that inbox.
- To test Google Calendar → Skimmer, add an event to your calendar and invite the same test customer's email.
- Wait up to 15 minutes. The work order appears in Skimmer, and the event description shows its reference number.
How each flow works
Each flow checks for new items every 15 minutes, so changes show up within a quarter hour. Each flow has a field mapping list on its setup step. To add a mapping, click the Add to button above the list, pick where the detail comes from, then pick where it goes. Click the arrow on a row to open it, or click the trash can to remove it. Keep the defaults if you're not sure.
Skimmer to Google Calendar
Every 15 minutes, Skimmer looks for work orders added since the last check. For each one, it adds an event to your calendar with the customer as an attendee, and Google emails the customer an invite. The invite comes from the Google account you connected.
The Work Order to Calendar Field Mapping list starts with four rows: Work Order Type, Work Needed, Service Location Address, and Customer Email.
| Event field | Filled by default with | You can also use |
|---|---|---|
| Title | Work order type | Work performed, customer name |
| Description | Work needed | Work performed, customer name |
| Location | Service location address | Work performed, customer name |
| Attendee | Customer's primary email | — |
| Start time | Scheduled time on the work order | — |
| Length | Estimated minutes on the work order | — |
If a work order has no scheduled time, the event starts at 10:00 AM on the service date. A work order with no service date or scheduled time doesn't get an invite. If the customer has no primary email, the event still goes on your calendar, but no one is invited. If it has no estimated minutes, the event lasts 1 hour. If a mapped field is empty, the invite uses the default. If the work order type is also blank, the event title is "Pool Service Appointment."
Skimmer always adds "Reference number:" and the work order number to the end of the event description. You can't change or remove it.
Google Calendar to Skimmer
Every 15 minutes, Skimmer checks your calendar for events that were created or updated. When it finds one, it matches the attendee's email to a customer's primary email. If the event has more than one guest, Skimmer uses the first one who isn't the event organizer or the calendar owner. If it finds a match, it creates a work order at that customer's first service location.
After it creates the work order, Skimmer adds "Confirmed in Skimmer." and the reference number to the end of the event description. Attendees don't get an email about this change.
The Calendar to Work Order Field Mapping list starts with four rows: Event Summary (Title), Event Description, Attendee Email, and Event Start Time.
Skimmer skips:
- Canceled events.
- Events that already have a reference number or "Confirmed in Skimmer" in the description.
- Events with no attendee whose email matches a Skimmer customer.
| Work order field | Filled by default with |
|---|---|
| Customer | The customer whose primary email matches the attendee |
| Work needed | Event title |
| Work performed | Event description |
| Scheduled time | Event start time |
| Estimated minutes | Length of the event |
| Work order type | The type you chose for Work Order Type |
| Lead technician | The user you chose for Assigned User |
You can also map the event location and event end time to any available work order field: work needed, work performed, customer email, scheduled time, or service date. If a mapped field is empty, the work order uses the default. The exception is work performed: if you remove its row, work performed stays blank.
Change your Google Calendar settings
Use the setup wizard to turn flows on or off, change your mapping, or connect a different calendar. Your current settings are already filled in.
To turn off one flow, switch off its setting on that flow's step. Nothing runs for that flow while it's off, and your existing invites and work orders stay as they are.
- Click Integrations Center on the left navigation menu.
- In the Connected Integrations section, find the Google Calendar card and click Manage.
- On the Google Calendar detail page, click Configure.
- In the Configure Google Calendar window, click Reconfigure.
- Step through the wizard and update your settings.
- On the last step, click Finish. If you close the wizard without finishing, your existing settings stay the same.
Upgrade to a newer version
Most updates to the integration install automatically. When an update needs you to review your settings, an Upgrade button appears on the Google Calendar detail page in place of Configure.
- On the Google Calendar detail page, click Upgrade.
- In the Upgrade Google Calendar window, add any new information it asks for and click Finish. Your integration keeps running. If you cancel, your current version keeps working, and you can upgrade later.
Pause or unpause Google Calendar
Pausing stops both flows without changing your settings. Unpause any time to pick up where you left off, with no need to reconfigure.
- On the Google Calendar detail page, click the three dots menu.
- Click Pause integration. To turn it back on, click Unpause integration.
Disconnect Google Calendar
Disconnecting turns off both flows. Events and work orders the integration already created stay where they are.
- On the Google Calendar detail page, click Disconnect Google Calendar.
- In the Disconnect Google Calendar? window, click Disconnect to confirm. The Google Calendar card moves back to Available Integrations.
Troubleshooting
A customer didn't get an invite
- Check that Send Calendar Reminders to Customers is turned on.
- Check that the customer has a primary email in Skimmer.
- Check that the work order has a service date.
- Check that the work order was added after the flow was turned on. Skimmer doesn't send invites for work orders that already existed.
- Wait 15 minutes for the next check.
- Ask the customer to check their spam or junk folder.
A calendar event didn't create a work order
- Check that Create Work Orders from a Calendar Event is turned on.
- Check that the event has an attendee, and that the attendee's email matches a customer's primary email in Skimmer.
- Check that the customer has at least one service location. Skimmer creates the work order there.
- Check that the event isn't canceled and its description doesn't already have a reference number.
- Wait 15 minutes for the next check.
Events show the wrong time
Check the Calendar Time Zone on the Connection step. Use a standard time zone name, like America/New_York or America/Chicago. A new time zone applies to new invites only. It doesn't change events already on your calendar.
Nothing syncs
- Check that the Calendar ID Variable on the Connection step matches the Calendar ID in Google Calendar.
- Check that the Google account you connected can still add and edit events on that calendar.
- If you changed your Google password or removed Skimmer's access in your Google account, reconnect your Google account in Google Calendar Connection on the Connection step.
Still stuck?
Contact Skimmer Support. Include screenshots of your setup wizard steps, the work order number or event name that didn't sync, and the customer's email.